来点真正的3D
这节我们把三角改成四棱椎,矩形改成正方体。
效果如图4。
图4
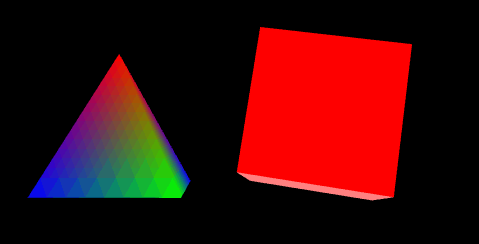
之前几节的图形是一个面,而立体的图形是由多个面组成的,我们一个面一个面地给出顶点坐标,画上去就得到了三维图形。
在绘制正方体的时候,我们增加一个索引。原因是:
- 相邻的面是有公共点的,如果所有面都各自用坐标表示,就多了许多重复工作,这时我们增加一个索引(index),只需给出所有点的坐标,就可以用索引来重复使用点。
- 如果我们用“POLYGON”画面,程序不清楚我们每个面有几条边,就要用for循环去一个面一个面画。如果用“TRIANGLE_STRIP”来画,则这个面画完,可能会和另一个面的顶点组成一个我们并不想画的三角形。如果用“TRIANGLES”来画,一个面四个点,等于两个三角形,两个公共点的坐标我们就需要多提供一次。使用索引+“TRIANGLES”,就方便多了。
为了让变量名更有意义一些,我们先把三角和矩形对应的变量名改成四面体和立方体。比如rTri改为rPyramid,triangleVertexPositionBuffer改成pyramidVertexPositionBuffer等等。
四面体用老方法来画,正方体用点索引的方法(具体方法是随意的,看怎么方便了)。
var cubeVertexIndexBuffer;
增加全局变量,正方体顶点索引的buffer。
function initBuffers()
{
    pyramidVertexPositionBuffer = gl.createBuffer();
    gl.bindBuffer(gl.ARRAY_BUFFER, pyramidVertexPositionBuffer);
    var vertices = [
                    // 正面
                     0.0, 1.0, 0.0,
                    -1.0, -1.0, 1.0,
                     1.0, -1.0, 1.0,
                    // 右侧面
                     0.0, 1.0, 0.0,
                     1.0, -1.0, 1.0,
                     1.0, -1.0, -1.0,
                    // 背面
                     0.0, 1.0, 0.0,
                     1.0, -1.0, -1.0,
                    -1.0, -1.0, -1.0,
                    // 左侧面
                     0.0, 1.0, 0.0,
                    -1.0, -1.0, -1.0,
                    -1.0, -1.0, 1.0
                    ];
    gl.bufferData(gl.ARRAY_BUFFER, new Float32Array(vertices),
        gl.STATIC_DRAW);
    pyramidVertexPositionBuffer.itemSize = 3;
    pyramidVertexPositionBuffer.numItems = 12;

    pyramidVertexColorBuffer = gl.createBuffer();
    gl.bindBuffer(gl.ARRAY_BUFFER, pyramidVertexColorBuffer);
    var colors = [
                 // 正面
                 1.0, 0.0, 0.0, 1.0,
                 0.0, 1.0, 0.0, 1.0,
                 0.0, 0.0, 1.0, 1.0,
                 // 右侧面
                 1.0, 0.0, 0.0, 1.0,
                 0.0, 0.0, 1.0, 1.0,
                 0.0, 1.0, 0.0, 1.0,
                 // 背面
                 1.0, 0.0, 0.0, 1.0,
                 0.0, 1.0, 0.0, 1.0,
                 0.0, 0.0, 1.0, 1.0,
                 // 左侧面
                 1.0, 0.0, 0.0, 1.0,
                 0.0, 0.0, 1.0, 1.0,
                 0.0, 1.0, 0.0, 1.0
                ];
     gl.bufferData(gl.ARRAY_BUFFER, new Float32Array(colors),
         gl.STATIC_DRAW);
     pyramidVertexColorBuffer.itemSize = 4;
     pyramidVertexColorBuffer.numItems = 12;
对四面体,给出了三维世界中每个面的顶点坐标,相应的numItems也自然和三角的不一样了。
    cubeVertexPositionBuffer = gl.createBuffer();
    gl.bindBuffer(gl.ARRAY_BUFFER, cubeVertexPositionBuffer);
    vertices = [
                // 正面
                -1.0, -1.0,  1.0,
                 1.0, -1.0,  1.0,
                 1.0,  1.0,  1.0,
                -1.0,  1.0,  1.0,

                // 背面
                -1.0, -1.0, -1.0,
                -1.0,  1.0, -1.0,
                 1.0,  1.0, -1.0,
                 1.0, -1.0, -1.0,

                // 顶部
                -1.0,  1.0, -1.0,
                -1.0,  1.0,  1.0,
                 1.0,  1.0,  1.0,
                 1.0,  1.0, -1.0,

                // 底部
                -1.0, -1.0, -1.0,
                 1.0, -1.0, -1.0,
                 1.0, -1.0,  1.0,
                -1.0, -1.0,  1.0,

                // 右侧面
                 1.0, -1.0, -1.0,
                 1.0,  1.0, -1.0,
                 1.0,  1.0,  1.0,
                 1.0, -1.0,  1.0,

                // 左侧面
                -1.0, -1.0, -1.0,
                -1.0, -1.0,  1.0,
                -1.0,  1.0,  1.0,
                -1.0,  1.0, -1.0,
                ];
    gl.bufferData(gl.ARRAY_BUFFER, new Float32Array(vertices),
        gl.STATIC_DRAW);
    cubeVertexPositionBuffer.itemSize = 3;
    cubeVertexPositionBuffer.numItems = 24;

    cubeVertexColorBuffer = gl.createBuffer();
    gl.bindBuffer(gl.ARRAY_BUFFER, cubeVertexColorBuffer);
    colors = [
              [1.0, 0.0, 0.0, 1.0],     // 正面
              [1.0, 1.0, 0.0, 1.0],     // 背面
              [0.0, 1.0, 0.0, 1.0],     // 顶部
              [1.0, 0.5, 0.5, 1.0],     // 底部
              [1.0, 0.0, 1.0, 1.0],     // 右侧面
              [0.0, 0.0, 1.0, 1.0]     // 左侧面
            ];
    var unpackedColors = [];
    for (var i in colors)
    {
        var color = colors[i];
        for (var j=0; j < 4; j++)
        {
            unpackedColors = unpackedColors.concat(color);
        }
    }
    gl.bufferData(gl.ARRAY_BUFFER, new Float32Array(unpackedColors),
        gl.STATIC_DRAW);
    cubeVertexColorBuffer.itemSize = 4;
    cubeVertexColorBuffer.numItems = 24;
代码还是把中正方体每个面的顶点分别给出了,以便给不同的面设置不同颜色,因为一个点有三个相邻面,我们无法给一个点设置三种颜色,但是可以在同一个位置放三个不同颜色的点。
颜色按顶点的顺序对应给出,这个for循环代码的逻辑,思考一下应该会明白。
    cubeVertexIndexBuffer = gl.createBuffer();
    gl.bindBuffer(gl.ELEMENT_ARRAY_BUFFER, cubeVertexIndexBuffer);
    var cubeVertexIndices =
        [
          0, 1, 2,      0, 2, 3,    // 正面
          4, 5, 6,      4, 6, 7,    // 背面
          8, 9, 10,     8, 10, 11,  // 顶部
          12, 13, 14,   12, 14, 15, // 底部
          16, 17, 18,   16, 18, 19, // 右侧面
          20, 21, 22,   20, 22, 23  // 左侧面
        ];
    gl.bufferData(gl.ELEMENT_ARRAY_BUFFER,
        new Uint16Array(cubeVertexIndices), gl.STATIC_DRAW);
    cubeVertexIndexBuffer.itemSize = 1;
    cubeVertexIndexBuffer.numItems = 36;
}
索引的设置方法与前面的顶点、颜色类似,只是相应改变了一些参数,如gl.ELEMENT_ARRAY_BUFFER、Uint16Array等。
function drawScene()
{
    //...
    gl.bindBuffer(gl.ELEMENT_ARRAY_BUFFER, cubeVertexIndexBuffer);
    setMatrixUniforms();
    gl.drawElements(gl.TRIANGLES,
        cubeVertexIndexBuffer.numItems, gl.UNSIGNED_SHORT, 0);
    ////mvPopMatrix();
}
绘制的时候,四面体依然使用gl.drawArrays()直接顶点数组画。对正方体使用索引来绘制,函数相应改为gl.drawElements(),当然执行绘制函数之前绑定的buffer也要对应IndexBuffer。
这样我们就得到了两个立体的旋转着的图形。